A note in 5 layers
From grisaille underpainting to colour glaze
The grisaille route is slower than alla prima by a factor of three, and it is still the most reliable way to learn what a picture is doing. You make every value decision once, in a single hue, and then you spend the rest of the painting deciding only about temperature.
- Section
- Method
- Support
- Oil
- Drying
- 总计 3–5 天工作日
- Published
Step 1–2: tone and shadow shape
Tone the ground with raw sienna at about fifteen percent strength so it reads as a warm light grey, not a colour. Then block the shadow shapes with a mix of ivory black and raw umber, thinned with odourless mineral spirits until it flows like ink.
At this stage do not draw edges — draw shapes. Every shadow shape should be a closed, readable silhouette on its own. If a shape needs a line to be understood, it is not yet a shape.
Step 3: lights into the grey
Add flake white to the same black-and-umber mix and work the light shapes in with a dry brush, dragging the edge where light meets shadow so the transition stays soft across about a centimetre. Keep the whites one step lighter than you think you need.
The is finished when you can squint at it and read three distinct value groups: light, mid, dark. Four or more groups means it is overworked and the glazes will struggle to unify it.
Step 4–5: warm then cool
Glaze warm first. Flesh and earth tones go over the light and mid shapes, thin enough that the grey drawing still shows through. Warm glazes over a neutral grey give a convincing optical skin; the grey does the modelling and the glaze does the temperature.
Only after the warm pass is dry do you introduce cool. A thin deep-teal glaze pushed into the shadow gaps and the cool side of every form does more for three-dimensional read than any amount of white highlight. Keep it out of the lights entirely.
Order of work
- Tone the panel and let it dry to the touch — no wet ground under a grisaille.
- Block shadow shapes in black-and-umber, solvent-thinned, no white.
- Wipe or dry-brush highlights back rather than painting them in at this stage.
- Add flake white for the light shapes and soften every light-shadow edge.
- Check in greyscale: three value groups, no more.
- Glaze warm first, cool second, one full dry day between them.
Layer schedule
| # | Layer | Technique | Mix | Dry |
|---|---|---|---|---|
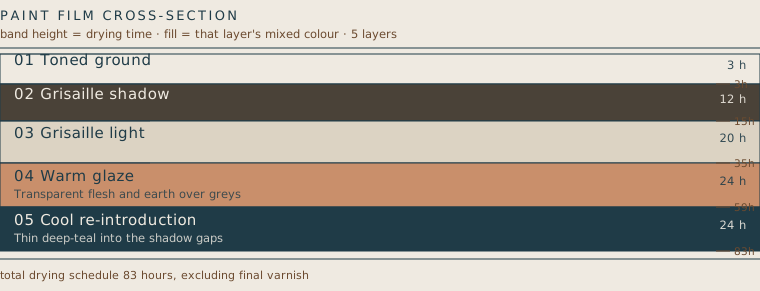
| 1 | Toned ground | Gesso toned with raw sienna, 15 % | #EFEAE1 | 3 h |
| 2 | Grisaille shadow | Ivory black + umber, solvent-thinned | #4A4238 | 12 h |
| 3 | Grisaille light | Add flake white, dry-brush into shadows | #DCD3C3 | 20 h |
| 4 | Warm glaze | Transparent flesh and earth over greys | #C98F6B | 24 h |
| 5 | Cool re-introduction | Thin deep-teal into the shadow gaps | #1F3B47 | 24 h |
Questions that come up
- Does the grey underpainting dull the final colour?
- Only if it is too dark or too opaque. Keep the grisaille one or two steps lighter than the value you want to finish at, because every transparent glaze added later will darken it further. Neutral greys dull colour; a warm grey-brown keeps it alive.
- How long should the grisaille dry before glazing?
- Touch-dry, typically 18–24 hours for a solvent-thinned pass. If you glazed while it is still tender the brush will lift grey into your colour and every passage will read as dirty.
Materials and safety note
Drying times assume a ventilated studio at 20 °C and 50 % relative humidity; cold or damp conditions extend them substantially. Solvents and metal-bearing pigments (lead white, cadmiums, cobalts) belong in a ventilated space, out of prolonged skin contact, and lead-bearing paint does not belong on anything a child handles. This page is craft information, not materials-safety, health or conservation advice.